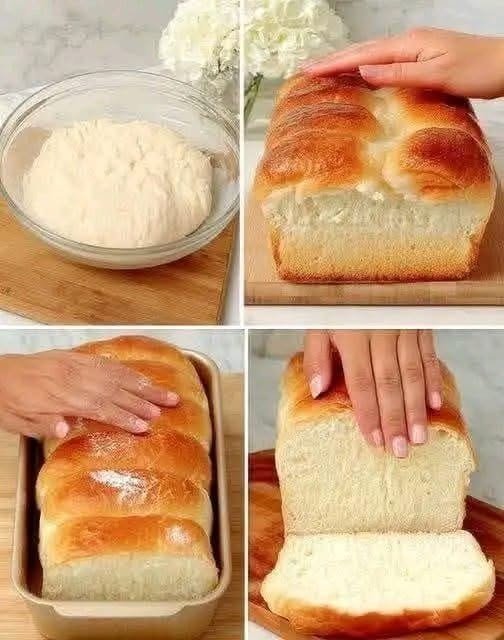
There’s nothing quite like the aroma of freshly baked bread filling your kitchen. If you love homemade bread but want something softer than a traditional artisan sourdough loaf, this Sourdough Sandwich Bread is the perfect recipe. It combines the rich flavor of natural sourdough fermentation with a light, tender crumb that’s ideal for sandwiches, toast, grilled cheese, and everyday meals.
Unlike crusty rustic sourdough, this loaf is enriched with milk, butter, and a small amount of sugar, giving it a soft texture and a mild flavor the whole family will enjoy. It’s easy to slice, stays fresh for several days, and is an excellent recipe for both beginners and experienced bakers.
Why You’ll Love This Sourdough Sandwich Bread
This homemade sandwich bread offers the best of both worlds. You get the depth of flavor that sourdough is known for while enjoying the softness of classic sandwich bread.
Some of the reasons you’ll love this recipe include:
- Soft and fluffy texture
- Perfect for sandwiches, toast, and French toast
- Naturally fermented with an active sourdough starter
- Mild sourdough flavor that isn’t overpowering
- Easy to slice without crumbling
- Stays fresh for several days
- Beginner-friendly recipe
Whether you’re preparing lunch for the family or making breakfast toast, this loaf is a reliable choice.
Ingredients
To make one standard loaf, you’ll need:
- 500g bread flour (or all-purpose flour)
- 100g active sourdough starter (fed and bubbly)
- 250ml lukewarm milk (or water)
- 30g softened butter
- 25g sugar (optional, for a slightly sweeter loaf)
- 10g salt
Equipment Needed
- Large mixing bowl
- Kitchen scale
- Dough scraper
- Standard loaf pan
- Clean kitchen towel or plastic wrap
- Cooling rack
Understanding Sourdough Sandwich Bread
Traditional sourdough bread usually has a chewy crumb and thick crust. Sandwich bread, however, is designed to be softer with a thinner crust and finer texture.
The addition of milk, butter, and sugar helps create:
- A soft and tender crumb
- Better moisture retention
- Richer flavor
- Longer freshness
- A lighter crust
The result is a loaf that’s perfect for everyday use while still offering the nutritional and flavor benefits of natural sourdough fermentation.
Before You Start
The most important part of this recipe is using a healthy, active sourdough starter.
Your starter should:
- Double in size after feeding
- Look bubbly and airy
- Have a pleasant, slightly tangy smell
- Pass the float test (optional)
Using an inactive starter can result in dense bread that doesn’t rise properly.
Step 1: Mix the Dough
In a large mixing bowl, combine the active sourdough starter, lukewarm milk, and sugar. Stir until the starter is mostly dissolved.
Add the flour and mix until a rough dough forms. Once combined, add the salt and softened butter. Continue mixing until the butter is fully incorporated.
The dough will feel slightly sticky at first, but it will become smoother during kneading.
Step 2: Knead the Dough
Transfer the dough to a lightly floured surface and knead for about 8–10 minutes.
As you knead, the dough should become:
- Smooth
- Elastic
- Soft
- Easy to handle
If the dough feels overly sticky, add a small amount of flour one tablespoon at a time. Avoid adding too much flour, as it can make the finished loaf dry.
A properly kneaded dough should stretch without tearing easily.
Step 3: Bulk Fermentation
Place the dough in a lightly greased bowl and cover it with a towel or plastic wrap.
Let it ferment in a warm place for about 4–6 hours. During this time, perform stretch-and-folds every hour.
How to Stretch and Fold
Gently pull one side of the dough upward and fold it toward the center. Rotate the bowl and repeat on all four sides.
Repeat this process two or three times during bulk fermentation.
Stretching and folding strengthens the gluten, improves the dough’s structure, and helps produce a soft, airy crumb.
By the end of fermentation, the dough should appear noticeably puffier.
Step 4: Shape the Dough
Lightly flour your work surface and gently turn the dough out.
Press it into a rectangle, then roll it tightly into a log, starting from one short side. Keep gentle tension on the dough while rolling to create a smooth surface.
Pinch the seam closed before placing the dough seam-side down.
Proper shaping helps produce an evenly risen loaf with beautiful slices.
Step 5: Prepare the Loaf Pan
Grease a standard loaf pan with butter or non-stick spray.
Place the shaped dough into the pan and cover it loosely with a towel.
The dough should sit comfortably in the pan without completely filling it.
Step 6: Second Rise
Allow the dough to proof for approximately 2–4 hours.
The exact timing depends on:
- Room temperature
- Strength of your starter
- Dough temperature
Rather than watching the clock, observe the dough. It is ready when it has risen to the top of the loaf pan and feels light and puffy.
Avoid over-proofing, as this can cause the loaf to collapse during baking.
Step 7: Bake the Bread
About 30 minutes before baking, preheat your oven to 180°C (350°F).
Bake the loaf for 30–35 minutes until the top turns a deep golden brown.
Your bread is done when:
- The crust is golden brown
- The loaf sounds hollow when tapped
- The internal temperature reaches approximately 95°C (203°F)
If the top browns too quickly, loosely cover it with aluminum foil during the final minutes of baking.
Step 8: Cool Before Slicing
Once baked, let the loaf rest in the pan for about 5 minutes.
Remove it carefully and transfer it to a cooling rack.
Allow the bread to cool completely before slicing. Cutting into hot bread can make the crumb gummy and sticky.
Patience will reward you with clean, even slices.
Serving Ideas
This soft sourdough sandwich bread is incredibly versatile.
Enjoy it as:
- Classic sandwiches
- Grilled cheese
- Avocado toast
- French toast
- Peanut butter and jelly sandwiches
- Garlic bread
- Breakfast toast with butter and jam
Its soft texture makes it suitable for almost any meal.
Helpful Tips for Success
For the best results, always use an active starter and allow enough time for fermentation. Bread flour generally produces a better rise because of its higher protein content, although all-purpose flour also works well.
Shape the dough tightly to encourage a taller loaf and even crumb. If you have extra time, refrigerate the shaped loaf overnight. The next day, let it sit at room temperature for 1–2 hours before baking. This cold fermentation develops a deeper sourdough flavor and improves texture.
Finally, allow the loaf to cool completely before slicing to achieve the best crumb structure.
Storage Instructions
Store the bread in an airtight container or bread bag at room temperature for up to 4 days.
Refrigeration is not recommended because it can dry out the loaf.
For longer storage, slice the bread before freezing. Keep the slices in a freezer-safe bag for up to 3 months. Individual slices can be toasted directly from frozen whenever needed.
Final Thoughts
This Sourdough Sandwich Bread is the perfect homemade loaf for anyone who loves soft, flavorful bread without sacrificing the benefits of natural sourdough fermentation. Its tender crumb, mild tangy flavor, and golden crust make it ideal for sandwiches, breakfast toast, grilled cheese, and everyday family meals.
Once you bake this loaf, you’ll discover just how rewarding homemade bread can be. With a little patience and an active sourdough starter, you can enjoy bakery-quality sandwich bread fresh from your own oven whenever you like.

Leave a Reply