There’s something special about homemade sandwich bread fresh out of the oven. The golden crust, the soft fluffy inside, and the comforting smell filling the kitchen make it one of the most rewarding things to bake at home. This Soft Homemade Sandwich Bread recipe creates a perfectly tender loaf with a light texture and buttery flavor that tastes far better than store-bought bread.
Whether you use it for toast, sandwiches, garlic bread, grilled cheese, or simply warm with butter, this loaf becomes an instant family favorite. The texture is soft enough for everyday sandwiches while still sturdy enough to slice beautifully without falling apart.
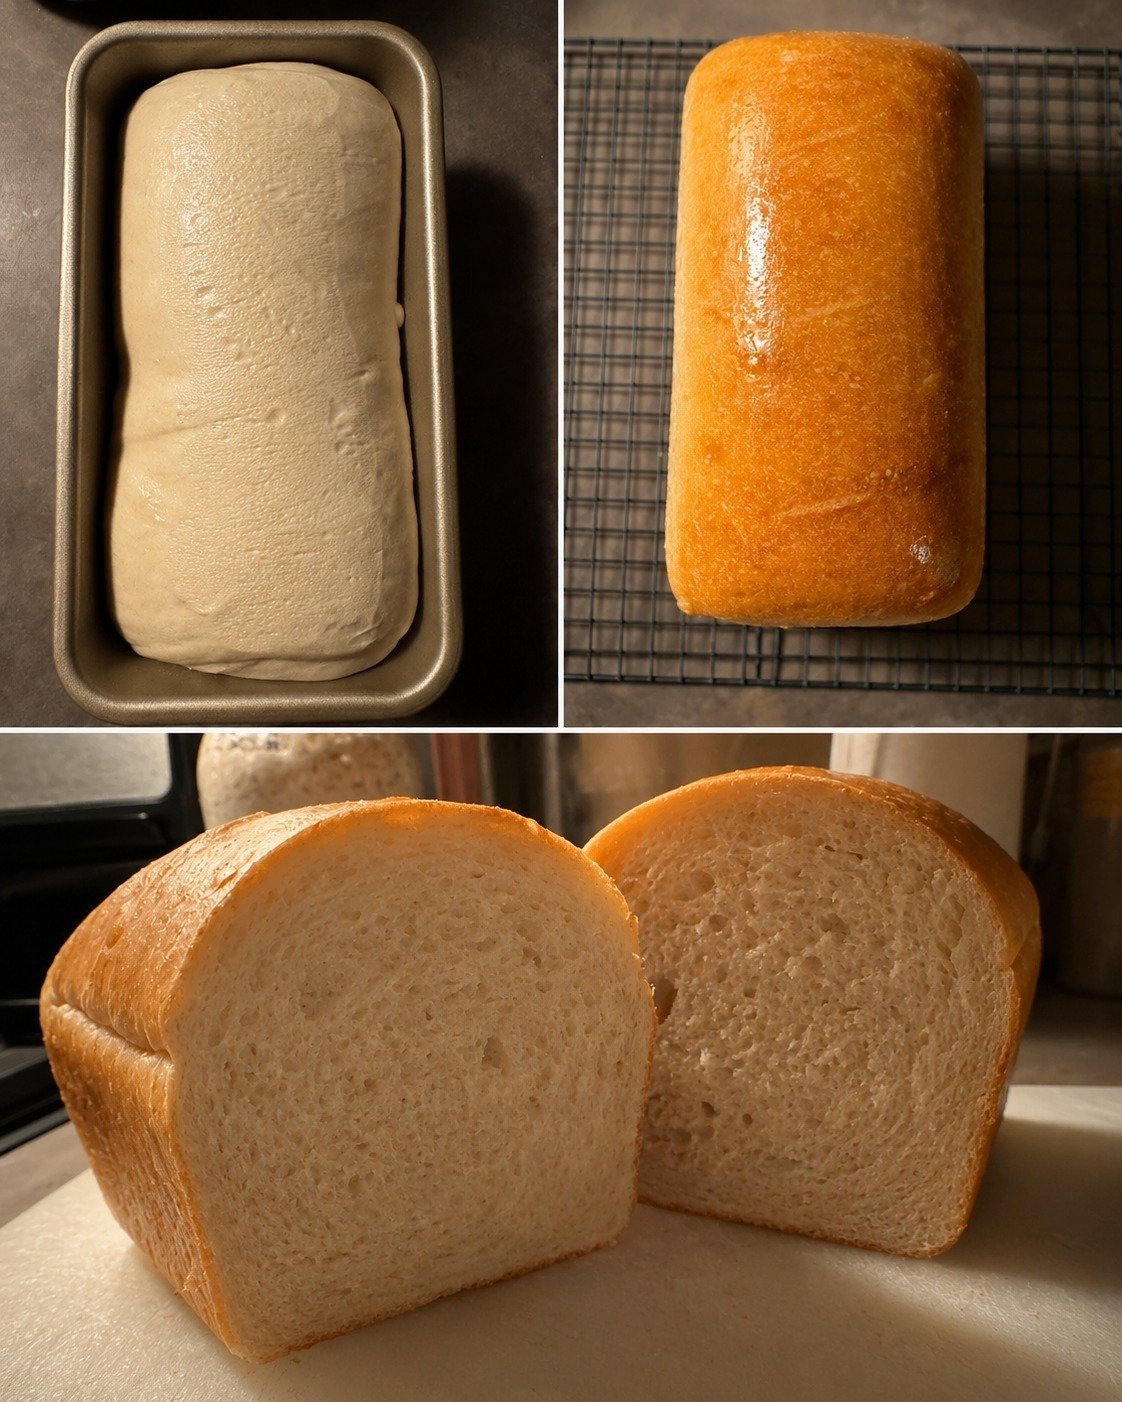
This recipe is beginner-friendly and gives bakery-style results every single time. The loaf rises tall, bakes evenly, and develops a beautiful golden crust while staying incredibly soft inside.
Why You’ll Love This Bread
This homemade sandwich bread has everything you want in a classic loaf:
- Super soft texture
- Fluffy and airy crumb
- Golden buttery crust
- Perfect for sandwiches and toast
- Easy ingredients
- Freezer-friendly
- Better than store-bought bread
Once you make fresh homemade bread yourself, it’s hard to go back to packaged loaves again.
Ingredients
Dry Ingredients
- 4 cups bread flour
- 2¼ teaspoons instant yeast
- 2 tablespoons sugar
- 1½ teaspoons salt
Wet Ingredients
- 1¼ cups warm milk
- ¼ cup warm water
- 3 tablespoons butter, softened
- 1 large egg
Optional for brushing:
- Melted butter on top after baking
Step 1: Activate the Yeast
In a mixing bowl, combine warm water, warm milk, sugar, and yeast.
Let it sit for about 5–10 minutes until the mixture becomes foamy.
This means the yeast is active and ready to use.
If the mixture doesn’t foam, the yeast may be expired or the liquid may have been too hot.
Step 2: Mix the Dough
Add the egg and softened butter into the yeast mixture.
Slowly add the flour and salt while mixing.
Continue mixing until a soft dough forms.
The dough should feel smooth and slightly tacky but not sticky.
If using a stand mixer, knead for about 8 minutes.
If kneading by hand, knead for 10–12 minutes until the dough becomes elastic and smooth.
Step 3: First Rise
Place the dough into a lightly greased bowl.
Cover with a towel or plastic wrap and let it rise in a warm place for about 1–1½ hours.
The dough should double in size.
This slow rise helps create the soft fluffy texture that makes homemade sandwich bread so delicious.
Step 4: Shape the Loaf
Once risen, gently punch down the dough to release excess air.
Transfer it onto a lightly floured surface.
Flatten the dough slightly into a rectangle, then roll it tightly into a log shape.
Pinch the seams underneath.
Place the shaped dough into a greased loaf pan.
Step 5: Second Rise
Cover the loaf pan lightly and let the dough rise again for about 45 minutes to 1 hour.
The dough should rise slightly above the edges of the loaf pan.
This second rise creates the beautiful tall sandwich loaf shape.
Step 6: Bake the Bread
Preheat your oven to 350°F (175°C).
Bake the loaf for 30–35 minutes until the top becomes deep golden brown.
The bread should sound hollow when tapped gently on top.
If the top browns too quickly, loosely cover it with foil during the final baking minutes.
Step 7: Brush with Butter
As soon as the bread comes out of the oven, brush the top with melted butter.
This keeps the crust soft and gives the loaf a beautiful glossy finish.
Let the bread cool in the pan for about 10 minutes before transferring it to a wire rack.
Cooling and Slicing
Allow the bread to cool completely before slicing.
Cutting too early may squash the soft crumb inside.
Once cooled, slice into even pieces using a serrated bread knife.
The inside should look soft, fluffy, and perfectly tender.
Tips for Perfect Sandwich Bread
Use Bread Flour
Bread flour creates better gluten structure and gives the loaf its soft chewy texture.
Don’t Add Too Much Flour
The dough should remain soft. Too much flour can make the bread dry and dense.
Knead Properly
Good kneading helps develop gluten, which creates that fluffy bakery-style texture.
Let It Rise Fully
Proper rising time gives the bread better flavor and softness.
Ways to Use Homemade Sandwich Bread
This bread is incredibly versatile.
You can use it for:
- Toast with butter and jam
- Grilled cheese sandwiches
- French toast
- Peanut butter sandwiches
- Garlic bread
- Breakfast toast
- Club sandwiches
- Bread pudding
It’s soft enough for kids’ lunches while still hearty enough for thick deli sandwiches.
Storage Tips
Store the bread in an airtight bag or bread container at room temperature for up to 4 days.
To keep it extra soft, avoid refrigerating it.
For longer storage, slice the loaf and freeze it. Toast slices directly from frozen whenever needed.
Common Mistakes to Avoid
Using Hot Liquid
Liquids that are too hot can kill the yeast.
Warm—not hot—is best.
Underkneading the Dough
Insufficient kneading can make the bread dense.
Overbaking
Too much baking time can dry out the loaf.
Bake just until golden brown.
Why Homemade Bread Tastes Better
Fresh homemade bread has a softness and flavor that packaged bread simply cannot match.
The buttery aroma, warm fluffy crumb, and fresh-baked taste make every slice feel comforting and special.
Plus, you control the ingredients and avoid unnecessary preservatives.
Final Thoughts
This Soft Homemade Sandwich Bread recipe is simple, comforting, and incredibly rewarding to make. The loaf comes out beautifully golden on the outside and perfectly fluffy on the inside, making it ideal for everyday use.
Whether you’re making toast in the morning, sandwiches for lunch, or warm buttered slices with dinner, this bread fits every occasion perfectly.
Once you taste fresh homemade sandwich bread straight from your own kitchen, you’ll understand why so many people fall in love with bread baking. The soft texture, rich flavor, and warm aroma make this recipe one you’ll want to bake again and again.

Leave a Reply