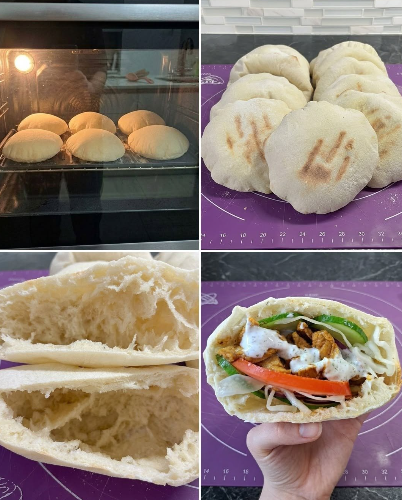
If you’ve ever wanted to make bakery-style pita bread at home, this recipe is exactly what you need. The pita bread in the image has beautifully puffed pockets, a soft, chewy texture, and a light golden finish that’s perfect for stuffing with grilled chicken, vegetables, falafel, or your favorite sandwich fillings. The secret to getting those perfect pockets is using a very hot oven and allowing the dough to rise properly before baking.
Whether you’re preparing lunch, dinner, or meal prep for the week, homemade pita bread tastes far better than store-bought and freezes beautifully. Once you master this easy recipe, you’ll never want to buy pita bread again.
Why You’ll Love This Recipe
- Soft, fluffy texture
- Perfect pockets every time
- Simple pantry ingredients
- No special equipment required
- Great for sandwiches, wraps, and dipping
- Freezer-friendly
- Better than store-bought pita bread
Prep Time
- Prep Time: 20 minutes
- Rise Time: 2 hours
- Bake Time: 5–7 minutes
- Total Time: About 2 hours 30 minutes
- Servings: 8 large pita breads
Ingredients
For the Dough
- 3½ cups (440g) all-purpose flour
- 1¼ cups warm water (110°F/43°C)
- 2¼ teaspoons active dry yeast (1 packet)
- 2 teaspoons sugar
- 1 teaspoon salt
- 2 tablespoons olive oil
Optional:
- 1 tablespoon milk powder (for extra softness)
Equipment Needed
- Large mixing bowl
- Rolling pin
- Baking tray or pizza stone
- Parchment paper
- Kitchen towel
- Cooling rack
Step 1: Activate the Yeast
Pour the warm water into a mixing bowl.
Add:
- Sugar
- Active dry yeast
Stir gently.
Let the mixture sit for about 10 minutes until it becomes bubbly and foamy.
If it doesn’t foam, your yeast is no longer active and should be replaced.
Step 2: Mix the Dough
Add:
- Olive oil
- Salt
- Flour
Mix until a shaggy dough forms.
Transfer to a lightly floured surface.
Knead for about 8–10 minutes until the dough becomes smooth, soft, and elastic.
If using a stand mixer, knead with the dough hook for 6–7 minutes.
The dough should be soft but not sticky.
Step 3: First Rise
Lightly oil a clean bowl.
Place the dough inside.
Cover with plastic wrap or a damp towel.
Let rise in a warm place for about 1–1½ hours, or until doubled in size.
Step 4: Divide the Dough
Punch down the risen dough to release the air.
Divide into 8 equal pieces.
Roll each piece into a smooth ball.
Cover them with a towel.
Let them rest for 20 minutes.
This resting period makes rolling much easier.
Step 5: Roll the Pitas
Lightly flour your work surface.
Roll each dough ball into a circle about:
- 6–7 inches wide
- ¼ inch thick
Try to keep each circle an even thickness. Uneven dough may not puff properly.
Cover the rolled pitas with a towel while you finish the rest.
Step 6: Preheat the Oven
This is the most important step.
Preheat your oven to 475°F (245°C) for at least 30 minutes.
If you have a pizza stone, place it inside while preheating.
A very hot baking surface creates the steam needed to form the signature pita pocket.
Step 7: Bake
Place 2–3 pitas on the hot baking tray or pizza stone.
Bake for 5–7 minutes.
Watch as they puff up into beautiful balloons.
Avoid opening the oven door during baking.
Once fully puffed and lightly golden, remove immediately.
Cover baked pitas with a clean kitchen towel to keep them soft.
Continue baking the remaining dough.
Step 8: Cool
Allow the pita bread to cool slightly before slicing.
As they cool, the steam settles inside, creating the perfect pocket for stuffing.
Serving Ideas
These homemade pita breads are incredibly versatile. Fill them with:
- Chicken shawarma
- Grilled chicken strips
- Beef gyro meat
- Falafel
- Tuna salad
- Egg salad
- Greek salad
- Chicken Caesar salad
- Turkey and cheese
- Hummus with roasted vegetables
- BBQ chicken
- Crispy chicken
- Chicken tikka
- Lamb kebabs
They are also delicious served alongside:
- Hummus
- Tzatziki
- Garlic sauce
- Baba ganoush
- Spinach dip
- Soup
- Curry
- Lentil stew
Storage
Store cooled pita bread in an airtight container or zip-top bag at room temperature for up to 3 days.
For longer storage, refrigerate for up to one week.
Freezing Instructions
Allow the pita bread to cool completely.
Stack them with parchment paper between each piece.
Place inside a freezer-safe bag.
Freeze for up to 3 months.
Thaw at room temperature and warm for a few seconds in the microwave or oven before serving.
Tips for Perfect Pita Bread
- Use fresh yeast for the best rise.
- Make sure the water is warm, not hot.
- Let the dough rise until doubled.
- Roll each pita evenly.
- Always preheat the oven thoroughly.
- Bake on a very hot surface.
- Don’t overbake, or the bread will become dry.
- Cover baked pitas with a towel immediately to keep them soft.
Recipe Variations
Whole Wheat Pita
Replace half of the all-purpose flour with whole wheat flour for a nuttier flavor.
Garlic Herb Pita
Mix garlic powder, dried oregano, and parsley into the dough.
Sesame Pita
Brush with water and sprinkle sesame seeds on top before baking.
Mini Pitas
Divide the dough into 12 smaller portions for snack-sized pockets.
Spicy Pita
Add paprika, chili flakes, or cumin to the dough for extra flavor.
Nutrition (Per Pita)
- Calories: 210
- Carbohydrates: 39g
- Protein: 6g
- Fat: 4g
- Fiber: 2g
- Sugar: 2g
- Sodium: 290mg
Nutrition values are approximate and may vary depending on ingredient brands and portion sizes.
Frequently Asked Questions
Why didn’t my pita bread puff up?
The oven may not have been hot enough, the dough may have been rolled unevenly, or it may not have rested long enough before baking.
Can I make the dough ahead of time?
Yes. After the first rise, refrigerate the dough overnight. Let it come to room temperature for about 30 minutes before shaping.
Can I cook pita bread on a skillet?
Yes. Heat a cast-iron skillet over medium-high heat and cook each pita for about 2 minutes per side. While the pockets may be slightly smaller than oven-baked pitas, they’ll still be soft and delicious.
Can I use bread flour?
Absolutely. Bread flour creates a slightly chewier texture and can produce an even fluffier pita.
With its soft interior, airy pocket, and lightly golden crust, this homemade pita bread is perfect for wraps, sandwiches, and dipping into your favorite sauces. Once you see each round puff up in the oven, you’ll understand why fresh, homemade pita is so satisfying—and why this recipe quickly becomes a family favorite.

Leave a Reply